Minggu, 06 Mei 2012

Tutorial Rooting Samsung Galaxy Tab 2 7.0

Apabila anda adalah seorang pengguna Galaxy Tab 2 7.0 dan ingin merootingnya, berikut adalah proses yang bisa anda lakukan.

I. Sebelum Mulai:

1. Rooting Galaxy Tab anda akan menghilangkan garansi dan cuma bisa didapatkan kembali baik dengan menginstall stock firmware atau unrooting tablet anda.

II. Download File yang diperlukan:

1. Download ClockworkMod Recovery.
2. Download Paket Rooting.
3. Download Odin tool.

III. Cara Install CWM Recovery pada Galaxy Tab 2 7.0

1. Pertama-tama, tutup Kies pada PC anda.
2. Reboot Galaxy Tab 2 anda ke mode download. Anda dapat melakukannya dengan cara menekan dan menahan tombol Volume TURUN and tombol Power secara bersamaan.
3. Tekan tombol Volume NAIK untuk memasuki mode download.
4. Jalankan Odin Tool pada PC anda dengan cara klik ganda pada file Odin3 v1.85.exe.
5. Hubungkan tablet anda ke PC dengan menggunakan kabel USB.
6. Pada Odin Tool, pilih PDA dan kemudian pilih file recovery.tar.md5 yang sudah anda download sebelumnya. Anda akan melihat tampilan berikut:
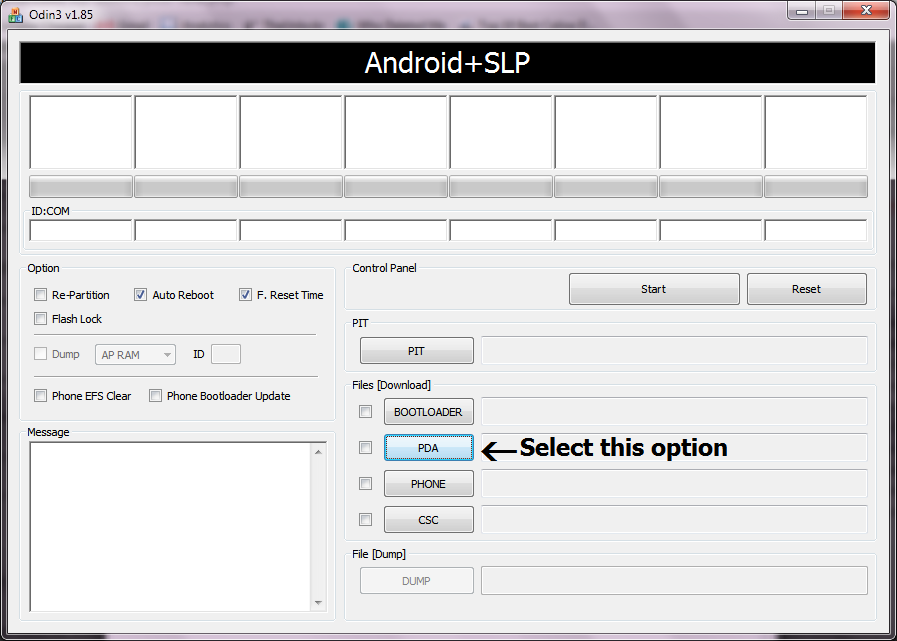
Odin-Tool
[ Pilih opsi "PDA" ]
7. Klik tombol Start untuk memulai flashing recovery. Tablet anda akan reboot ketika flashing selesai.
8. Lepaskan hubungan tablet dari PC.
Kita telah selesai menginstall CWM recovery pada tablet, sekarang lanjutkan ke prosedur rooting.

IV. Cara Rooting Galaxy Tab 2 7-inch:

1. MATIKAN tablet.
2. Boot tablet ke recovery mode dengan menekan dan menahan sekaligus Volume NAIK and tombol Power terus menerus.
3. Pilih opsi "install zip from sdcard" dan kemudian arahkan ke paket rooting yang sudah didownload sebelumnya. Ini akan mulai proses rooting tablet anda.
4. Ketika proses rooting selesai, pilih "Reboot system now" dari menu recovery.
Semuanya selesai sekarang. Anda telah sukses rooting dan install CWM recovery pada tablet anda. Metode sederhana ini dipersembahkan oleh nycbjr di RootzWiki, anda harus berterima kasih/donate kepada dia di RootzWiki untuk kerja kerasnya tersebut!

Catatan: Do at your own risk (resiko ditanggung sendiri), penulis cuma sharing dan tidak bertanggungjawab atas apapun yang terjadi setelah melakukan proses tersebut diatas.

Senin, 05 Maret 2012

How to Make Your Phone Looks Like a Windows Phone 7


This is a tutorial on how to make your phone look like a Windows Phone 7 phone.
In this thread, I'll be covering the launcher, WP7 like apps, and custom fonts.

So let's get started!!!

Launcher
We need to download Launcher7 from the market or here. The dev made a really awesome job. It resembles WP7 very well.
You can customize it however you want. You can find custom tiles here and here.
To make it more believable, go to Launcher7 settings > StatusBar options and check "Use WP7 style statusbar". The rest of the options is your choice.

Lock Screen
For the lockscreen we will download an app from the market named WP7Lock. Customize it on your own likeliness. Simple step.

CM7 WP7 Theme
The theme is needed only when you're out of the launcher because the launcher has it's own status icons and drawer icons.
You can download the theme here. This is the original thread. The theme doesn't have a preview, so it's a little difficult to select it in the theme chooser.

Themed Apps
Time for the themed apps. Click the links to download the corresponding app.
Boot Animation
You can download the animation from this thread. However, the creator doesn't provide a MDPI version. You'll have to go with the LDPI one (QVGA). It will appear in the center of the screen while the outer space of the screen will be black.
To install: Download the QVGA version and rename it "bootanimation.zip". Put that file into system/media/. To keep the old one, rename it to "bootanimation.zip.bak". Give the following permissions (to the new):

[V][V][ ]
[V][ ][ ]
[V][ ][ ]

Fonts
The WP7 SegoeUI fonts are just gorgeous. Check the zip file in the attachments. Download it, put it in your SD card, reboot to CWM recovery and flash as custom zip.
I know it says "Installing ROBOTO font". Don't mind about that. It is installing SegoeUI font, I just had to get an already made zip to use as a base.

Sounds and Ringtones
In this and this thread you can download the original WP7 sounds and ringtones.

And that's it! Now your phone looks like a Windows Phone 7. Enjoy your new phone!
 
Credit to:  Chris95X8 
Source : XDA-DEVELOPER

Minggu, 15 Januari 2012

First look of Sony Xperia™ ion & Xperia™ S

Sony Xperia™ ion


Some of the key features for Xperia™ ion are:
- 4.6 inch HD Reality display with Mobile BRAVIA® Engine, with HD resolution screen (1280 x 720), as well as rear (1080p) and front (720p) cameras for HD recording
- 1.5 GHz dual-core processor for fast browsing and content download, which can be stored on the internal 16GB flash storage.
- 12 MP rear camera with Sony Exmor R™ for mobile with fast/capture to go from standby to first shot in 1.5 seconds.
- HD sharing through DLNA, HDMI and BRAVIA sync to quickly and easily stream content to other screens.
- PlayStation™ Certified and access to entertainment services from Sony Entertainment Network, like Music Unlimited and Video Unlimited.

http://blogs.sonyericsson.com/produc...%E2%84%A2-ion/
http://developer.sonyericsson.com/wp...the-us-market/

-----------------------------------------------------------------------------

Sony Xperia™ S


Here is an overview of the key features for Xperia™ S:
- 4.3 inch Reality Display with Mobile BRAVIA® Engine with HD resolution screen (1280 x 720), as well as front (720p) and back (1080p) cameras for HD recording.
- 1.5GHz dual-core processor for fast browsing and content download, which can be stored on the internal 32GB flash storage.
- 12MP back camera with Sony Exmor R™ for mobile along with Fastest Capture to take shots in just 1.5 seconds directly from standby mode. Front-facing camera with 1.3 MP.
- NFC (Near Field Communications) enabled to access growing range of NFC applications and services as well as Xperia SmartTags.
- With HD sharing through DLNA, HDMI and using BRAVIA Sync for controlling your Xperia S with your TV remote control when connected to the TV, Xperia™ S delivers a full HD experience on TV.
- PlayStation™ Certified, that guarantees a high quality smartphone gaming experience and access to the PlayStation® Store.

http://blogs.sonyericsson.com/produc...-new-xperia-s/
http://developer.sonyericsson.com/wp...-the-xperia-s/
http://semcblog.com/2012/01/09/sony-...nces-xperia-s/

Minggu, 25 Desember 2011

EXCLUSIVE: Big Sony Ericsson Arc HD (Nozomi) live shots pop up

Now look what we found in our mailbox this morning. We just received photos of the upcoming Sony Ericsson flagship and some specs to go with them. Unfortunately, we didn't get the name cleared out so we don't know if the earlier, Sony Ericsson Arc HD rumors carry some water or not.
The smartphone codenamed Sony Ericsson Xperia Nozomi will come with Android 2.3.5 Gingerbread at launch and will be built around a 4.3" LCD display of HD resolution (1280 x 720 pixels). The 12 megapixel camera with FullHD video recording was also confirmed by our tipster.
Next, the rumored Snapdragon chipset featuring a couple of 1.5GHz Scorpion cores and the Adreno 220 GPU is indeed what you will be getting on the Sony Ericsson Xperia Arc HD. There will be an HDMI port as well, so sharing 1080p content with your HDTV will be a breeze.
Sadly, the Arc HD will lack a microSD card slot and you'll have to make do with the 16GB or 32GB of onboard storage (depending on the version you pick). At least, with 1GB of RAM your multitasking needs should be taken care of pretty well.
Interestingly, though, the handset uses a microSIM slot and the battery seems non-user-removable.
Sony Ericsson Xperia Arc HD Sony Ericsson Xperia Arc HD Sony Ericsson Xperia Arc HD Sony Ericsson Xperia Arc HD
Sony Ericsson Xperia Arc HD a.k.a. Sony Ericsson Nozomi live shots

The tipster couldn't provide us with an official launch date, but we are keeping our fingers crossed for an announcement at CES at the start of next year.
Sony Ericsson Xperia Arc HD Sony Ericsson Xperia Arc HD Sony Ericsson Xperia Arc HD
Sony Ericsson Xperia Arc HD a.k.a. Sony Ericsson Nozomi live shots

Source: gsmarena

Rabu, 21 Desember 2011

Modding Tablet IMO X3 Mirip HoneyComb

Gempuran tablet Android yang bertubi-tubi dan animo masyarakat yang lumayan tinggi, nampaknya menginspirasi para vendor lokal untuk berlomba-lomba menggelontorkan produk sejenis ke pasaran. Dan menariknya lagi, tablet Android lokal ini dibanderol dengan harga yang sangat terjangkau. Salah satunya adalah IMO X3 yang dijual dengan harga kurang dari 800 ribuan.

Sistem operasi yang ditanamkan ke tablet Android ini pun terbilang lumayan updated, yakni versi 2.2 Froyo. Sayang, masih ada beberapa kendala yang akan dijumpai pada tablet jenis ini. Misalnya, OS-nya masih  berupa versi ripped, alias sudah dipangkas fitur standarnya. Tak ada android market (diganti dengan AppMarket), tidak mendukung “Live Wallpaper”, konsumsi baterai yang boros, dan fungsi Modem (default) yang sangat sulit untuk terkoneksi dengan Modem USB Stick, meskipun sudah menggunakan tipe yang tertera di daftar ‘kompatibilitas Modem’.

Keterbatasan-keterbatasan ini sebenarnya masih bias diminimalisir, tapi tentunya dengan melakukan trik khusus. Yakni menggunakan metode rooted/unlock atau di-upgrade, istilah kerennya di-modding alias modifikasi. Yang jadi pertanyaan, bagian mana yang harus di-modding? Nah…Karena proses ini terkait sistem, jadi yang akan di-modding adalah ROM (Read Only Memory).

Sebagai OS terbuka, tentu saja banyak pihak yang melakukan modifikasi dan menawarkan ROM custom Android. Peruntukannya pun tak hanya untuk ponsel saja, Custom ROM untuk Tablet Android pun banyak ditawarkan para modifikator. Seperti untuk IMO X3 atau Wonder Media WM8650 ini.
Berikut ini ritual modifikasi yang dapat dilakukan untuk mengurangi keterbatasan dari IMO X3:
Dengan menggunakan ROM modding “Universal Uberoid WM8650 1.5.3 HoneyCombMOD v9” dengan file ROM yang bisa didownload dari http://techknow.freeforums.org/uberoid-wm8650-1-5-1-hybrid-honeycombmod-v7-1-t1010.html. Hasilnya, X3 Anda akan lebih 'segar' dengan tampilan mirip tablet Galaxy Tab 10.1 yang berbasis Honeycomb. Ingat, disamping mendapatkan hasil yang oke, resiko modding adalah tanggung jawab modder sendiri.

Proses instalasi ROM:
  1. Sisipkan kartu microSD ke PC/Laptop. Bisa menggunakan card reader atau port khusus yang ada di PC/Laptop.
  2. Format kartu microSD menggunakan sistem FAT32.
  3. Cari tahu tipe/model Tablet Android IMO X3 Anda (misalnya VIA WM8650/M009s/M003s/M012s/etc.). Buat  spesifikasi lengkapnya, bisa melihat di link berikut http://techknow.freeforums.org/how-to-identify-my-tablet-noobies-read-this-first-t673.html
  4. Ekstrak/Unzip file ROM Universal Uberoid WM8650 1.5.3 HoneyCombMOD v9 yang telah didownload ke folder PC/Laptop.
  5. Jalankan file "CHANGER.EXE" yang ada di folder hasil ekstrak ROM modding.
6. Masukan nomor kode dari tipe/model Tablet Android Anda di kotak dialog bagian bawah. Selanjutnya tekan  "Enter". Misalnya, Anda pilih ROM dari tipe M009s Blue LED 7", di kotak dialog tersebut ketik angka 2 lalu     Enter.
Catatan: Untuk trik yang PULSA lakukan di IMO X3 adalah menggunakan opsi 2. Namun, di beberapa kasus ada yang menggunakan opsi 8 untuk menanggulangi tidak berfungsinya touchscreen.
7. CHANGER.EXE akan menampilkan notifikasi untuk menyimpan ROM modifikasi ke microSD, pilih 'Y' selanjutnya    tekan Enter. Proses modifikasi dan copy ROM ke microSD akan berlangsung secara otomatis.
8.  Setelah sukses ter-copy ke microSD, cabut kartu memori tersebut
9.  Matikan Tablet Android IMO X3
10. Masukan kartu microSD ke slot yang tersedia.
11. Hidupkan Tablet Android IMO X3
Catatan: Pastikan, setelah berhasil memodifikasi IMO X3 Anda, hapus file yang ada di kartu microSD tadi (format ulang kartu microSD) jika ingin digunakan untuk penyimpanan file. (Sumber: Tabloid Pulsa)

Tutorial Setting Modem di Tablet Android Lokal/Cina


Menjamurnya Tablet Android merk lokal yang dibanderol dengan harga ‘sangat’ murah, tentu saja jadi pilihan baru bagi konsumen. Di pasaran, Tablet jenis ini malah ada yang dijual kurang dari Rp 1 juta, tepatnya sekitar Rp 800 ribuan yakni IMO Tab X3. Di kisaran harga yang tak terlalu jauh ada IMO Tab X5, Websong Epad dan sebagainya.

Rata-rata tidak didukung slot SIM card untuk kebutuhan akses data. Untuk akses internet ini menggunakan jalur WiFi. Namun, di kebanyakan Tablet Android tersebut tersedia fitur “3G Settings”. Nah…Dengan fasilitas ini, BGer’s bisa memanfaatkan dongle Modem Stick USB yang dikoneksikan ke port khusus buat keperluan akses internet.

Kendalanya, kita harus melakukan pengaturan manual serta menggunakan Modem USB khusus. Berdasarkan spesifikasi yang terdapat di menu ‘3G Settings’ tersebut, modem yang mendukung diantaranya:

•    WCDMA (Huawei E220, E230, E169, E169G, E160X, E1750, etc.)
•    CDMA2000 (Bora9380/AWIT-U8)
•    TD-CDMA (TD368)

Di panduan setting ini, kita menggunakan Modem Huawei E169 dan Tablet Android IMO Tab X5. Berikut langkah-langkah pengaturannya
1. Hubungkan konektor/converter USB ke port yang ada di Tablet Android. Pastikan antara dongle dan port tertancap dengan benar dan pas.
2. Colokan dongle Modem USB ke konektor/converter USB. Secara otomatis, Tablet Android akan mendeteksi Modem USB tersebut yang ditandai dengan ‘berkedip’-nya indikator LED di Modem.
3. Selanjutnya, masuk ke menu “3G Settings” yang ada di Tablet Android.
4. Klik “Add 3G network”.
5. Isikan data-data yang diminta sesuai profile internet operator yang digunakan. Sebagai contoh, kita menggunakan paket data Unlimited XL.
Name: XL
Device: Pilih sesuai daftar Modem yangg digunakan (WCDMA (Huawei E220, E230, E169, E169G, E160X, E1750, etc.)
Device Number: *99# atau ada juga yang menggunakan *99***1#
APN: xlunlimited
User: Kosongkan
Password: Kosongkan
6. Klik “Done”.
7. Nah…untuk mengkoneksikan Modem, tinggal pilih “Connect”
8. Jika terkoneksi, akan muncul notifikasi “connect” di bawah profile 3G network yang didaftarkan, dan muncul indicator “3G” di bagian atas ‘notification bar’.
9. Selesai, kita pun sudah bisa memulai browsing internet.

Selamat mencoba…!

Tutorial Unlocked Bootloader Xperia X8i

peralatan yang dibutuhin:

- flashtool download disini atau disini
- S1tool download disini
- Unlocker download disini

step by step:
A. S1TOOL
=========
1. unzip semua file hasil download
nanti nya ada 3 file (folder)
- Flashtool
- S1tool
- msm7227


2. matiin X8 nya
3. jalanin S1tool, klik do JOB
4. tahan tombol back X8 sambil tancepin kabel data ke PC
5. perhatikan ada kalimat:
- "SEMC SIMLOCK CERTIFICATE" <--bisa di unlock
- jika yang keluar "NOT RECOGNIZED SIMLOCK CERTIFICATE" artinya ga bisa di unlock
6. disconnect X8, matiin X8

B.msm7227
===========
ingat hasil yang tadi di dapat dari S1tool
nyalain X8 sambung ke PC
pastikan USB debugging nya ON

1. kalo di S1tool dapet "SEMC SIMLOCK CERTIFICATE" jalankan "msm7227_semc.cmd"
2. kalo di S1tool dapet "SEMC SIMLOCK CERTIFICATE" was not found jalanin "msm7227_Setool2.cmd"
3. tunggu sampe keluar "press any key to continue..." pijit tombol apa aja sampe jendela nya ketutup sendiri

C. S1tool
========
1. matiin X8
2. buka S1tool, klik "DO JOB"
3. tahan tombol back sambil colokin kabel data
4. perhatiin kalimat : RUNNING S1_EROM VER "x8A029"
5. jika x = r contoh: r8A029 artinya bootloader sudah berhasil di unlock
6. jika x = R contoh: R8A029 artinya unlock gagal, ulangi proses baca dengan teliti step by step nya

sumber: xda-developers

PERHATIAN:
baca dengan teliti sebelum proses
DO IT ON YOUR OWN RISK!!