Now look what we found in our mailbox this morning. We just received photos of the upcoming Sony Ericsson flagship and some specs to go with them. Unfortunately, we didn't get the name cleared out so we don't know if the earlier, Sony Ericsson Arc HD rumors carry some water or not.
The smartphone codenamed Sony Ericsson Xperia Nozomi will come with Android 2.3.5 Gingerbread at launch and will be built around a 4.3" LCD display of HD resolution (1280 x 720 pixels). The 12 megapixel camera with FullHD video recording was also confirmed by our tipster.
Next, the rumored Snapdragon chipset featuring a couple of 1.5GHz Scorpion cores and the Adreno 220 GPU is indeed what you will be getting on the Sony Ericsson Xperia Arc HD. There will be an HDMI port as well, so sharing 1080p content with your HDTV will be a breeze.
Sadly, the Arc HD will lack a microSD card slot and you'll have to make do with the 16GB or 32GB of onboard storage (depending on the version you pick). At least, with 1GB of RAM your multitasking needs should be taken care of pretty well.
Interestingly, though, the handset uses a microSIM slot and the battery seems non-user-removable.


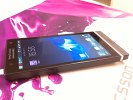

Sony Ericsson Xperia Arc HD a.k.a. Sony Ericsson Nozomi live shots
The tipster couldn't provide us with an official launch date, but we are keeping our fingers crossed for an announcement at CES at the start of next year.


Sony Ericsson Xperia Arc HD a.k.a. Sony Ericsson Nozomi live shots
Source: gsmarena
The smartphone codenamed Sony Ericsson Xperia Nozomi will come with Android 2.3.5 Gingerbread at launch and will be built around a 4.3" LCD display of HD resolution (1280 x 720 pixels). The 12 megapixel camera with FullHD video recording was also confirmed by our tipster.
Next, the rumored Snapdragon chipset featuring a couple of 1.5GHz Scorpion cores and the Adreno 220 GPU is indeed what you will be getting on the Sony Ericsson Xperia Arc HD. There will be an HDMI port as well, so sharing 1080p content with your HDTV will be a breeze.
Sadly, the Arc HD will lack a microSD card slot and you'll have to make do with the 16GB or 32GB of onboard storage (depending on the version you pick). At least, with 1GB of RAM your multitasking needs should be taken care of pretty well.
Interestingly, though, the handset uses a microSIM slot and the battery seems non-user-removable.
Sony Ericsson Xperia Arc HD a.k.a. Sony Ericsson Nozomi live shots
The tipster couldn't provide us with an official launch date, but we are keeping our fingers crossed for an announcement at CES at the start of next year.
Sony Ericsson Xperia Arc HD a.k.a. Sony Ericsson Nozomi live shots
Source: gsmarena


